Project files
22 KB
Machine-translated by Robotheca from the original in Chinese (opens in a new tab). License: MIT (opens in a new tab).
🎯 What is this
MindPaw is a desktop quadruped robot project based on the ESP8266 microcontroller. Its features include:
- More than just a remote control car — You can talk to it, make gestures at it, and it will respond with emotional reactions
- Real AI conversations — Integrated with the Doubao large model for intelligent dialogue
- Truly affordable — Total materials cost less than ¥50 (basic version only ¥35)
- Truly open source — All code, circuit diagrams, and 3D printing files are provided
This project was built from scratch, not using any ready-made development board kits. So if you want to learn how to integrate ESP8266, servos, cameras, voice modules, and AI together, the code and documentation here should help you.
🚦 Where to Start
This repository is divided into two non-blocking paths:
| Path | Target Audience | Entry Point |
|---|---|---|
| MindPaw Demo | Beginners, hardware enthusiasts who want to replicate and play with the robot dog | MindPaw_main/README.md |
| MindPaw AI Infra | AI infrastructure, edge computing, and Agent researchers | ai-infra/README.md |
| 🛰️ MindPaw 2.0 Streaming 3D Reconstruction | Adding "seeing ahead" capabilities to the robot dog (obstacle avoidance + browser-based point cloud) | Docs/09_Streaming_Recon.md |
| SCH & PCB | Those who want to design their own boards, prototype, or troubleshoot power/wiring issues | SCH&PCB/README.md |
Beginners do not need to install Python, Docker, or AI Gateway; after completing the basic demo, they can follow their interests into the research path. Both paths share the same firmware and hardware; leaving the Gateway address blank will revert to the original direct connection mode. The 2.0 perception layer is disabled by default; enabling it requires filling in a Recon Gateway URL in aiconfig.html.
✨ Feature Overview
| Feature | Trigger | Robot Action |
|---|---|---|
| Voice Control | Say "forward", "happy", "hello" | Execute actions, switch expressions, play sound effects |
| Gesture Control | Wave/fist/point in front of the camera | Recognize gestures and execute corresponding actions |
| Web Control | Open 192.168.4.1 in a mobile browser | Complete remote control interface with touch controls |
| AI Conversation | Web chat / Say "hello" via voice | Call Doubao API, reply with actions + expressions |
| AI Infra Gateway | Optional configuration of Gateway address | AI infrastructure tutorial for researchers; beginners can skip entirely |
| 🛰️ Streaming 3D Reconstruction Perception Layer (v2.0) | Automatic camera streaming | Stream each frame to Edge Gateway; robot dog can sense obstacle distance and auto-avoid; browser visualizes sparse point cloud. See Docs/09_Streaming_Recon.md |
| Emotional Response | Runs continuously and changes automatically | Displays emotions like happy/bored/sad based on interaction frequency and content |
| Expression Display | OLED screen display | 7 expressions + weather + time |
| Audio Feedback | Speaker plays melodies | 10 sound effects for startup/command confirmation/emotional expression |
🛒 What You Need
Bill of Materials
The following prices are based on actual listings from Taobao/Pinduoduo (July 2026). Bulk purchases may be cheaper.
🏆 Option 1: Full version (≈¥50, with camera gesture recognition)
| Module | Reference Price | Purchase Suggestion |
|---|---|---|
| ESP12F module | ¥5 | Buy bare module and solder it yourself; avoid NodeMCU development board (¥15, 3 times more expensive) |
| SG90 servos ×4 | ¥12 | ¥12 for 4 on Pinduoduo; ¥3.5 each if bought separately on Taobao |
| SSD1306 OLED 128×64 I2C | ¥6 | White is cheapest; blue ¥7, dual-color ¥9 |
| OV2640 camera | ¥15 | Buy bare board without FIFO; avoid ArduCAM Mini (¥25) |
| HLK-V20 voice module | ¥9 | Search "SU-03T"; cheaper than "HLK-V20", same thing |
| 8Ω speaker + S8050 + resistors & capacitors | ¥3 | A set of components; shipping often costs more than the goods; recommended to buy together with others |
| PCB prototype | ¥0 | JLCPCB offers 2 free coupons per month |
| 3D printing | ¥0 | JLCPCB new users get free coupons |
| USB power supply | ¥0 | Phone charger + MicroUSB cable; everyone has one |
| Total | ≈ ¥50 |
🥉 Option 2: Basic Version (≈¥35)
Remove the camera, keep voice control + AI conversation + emotional interaction. Suitable for beginners before upgrading.
| Module | Price |
|---|---|
| ESP12F ¥5 + SG90×4 ¥12 + OLED ¥6 + SU-03T ¥9 + Speaker Kit ¥3 | ≈ ¥35 |
💡 Note: ¥35-¥50 is the bare material price, excluding postage (≈ ¥8). It is recommended to buy all components at once for the first purchase, as postage is only paid once.
Software Preparation
| Software | Purpose | Download Link |
|---|---|---|
| VSCode | Code editor | code.visualstudio.com (opens in a new tab) |
| PlatformIO extension | Compilation and flashing | Search and install in VSCode extension store |
| Python 3 | Image conversion tool | python.org (opens in a new tab) |
| JLCPCB EDA Professional Edition | View/modify PCB | pro.lceda.cn (opens in a new tab) |
| SU-03T Configuration Tool | Configure voice module | Search "SU-03T configuration tool" on Baidu |
Free Accounts to Apply For
| Service | Purpose | Application Link | Optional? |
|---|---|---|---|
| Seniverse Weather | Fetch weather information | seniverse.com (opens in a new tab) | Optional |
| Volcano Engine Ark | AI conversation (Doubao) | console.volcengine.com (opens in a new tab) | Optional |
| JLCPCB | Free PCB prototyping, 3D printing | jlc.com (opens in a new tab) | Optional |
Both APIs above are optional features. Without configuration, the robot dog's basic movement, expressions, and voice control will still work normally.
🚀 How to Replicate
To build a MindPaw from scratch, follow this order.
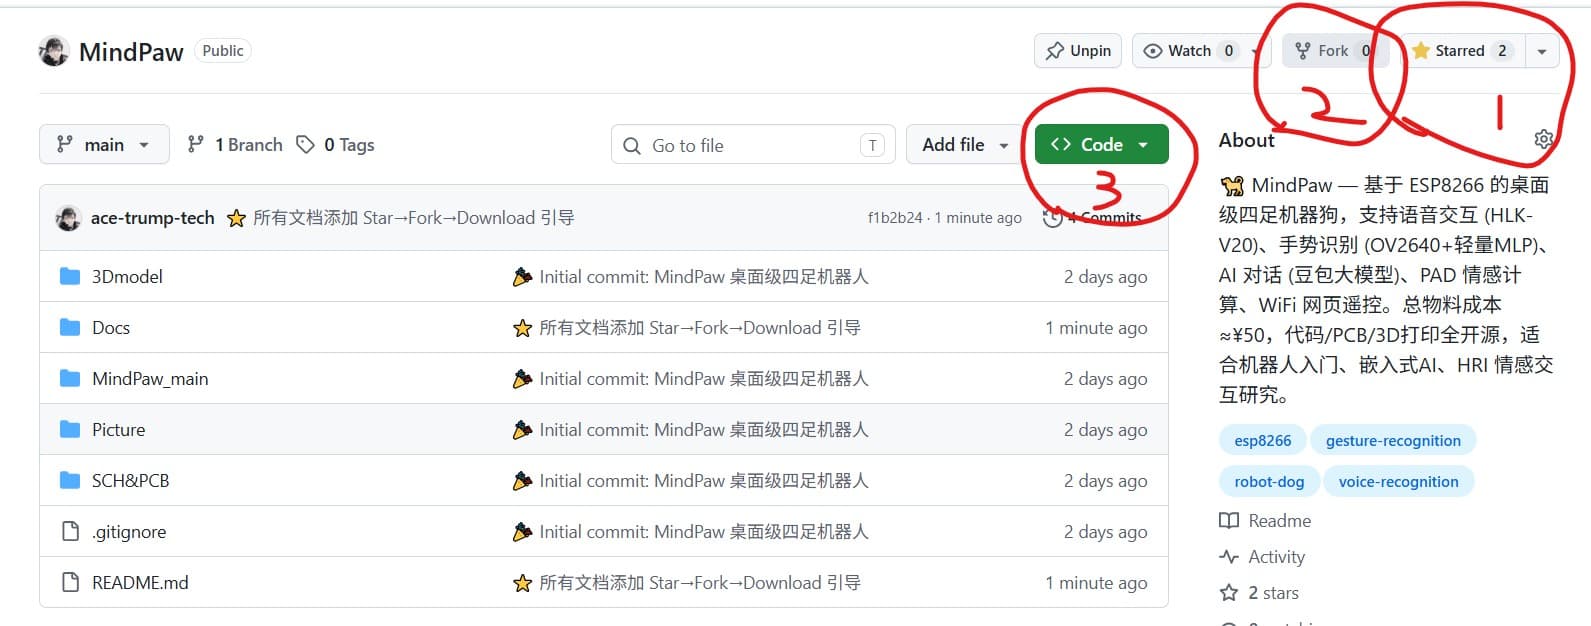
⭐ Before you start, please support this open-source project:
- Star ⭐ — Click the ⭐ Star button in the top-right corner of the repository to bookmark this project for easy access later.
- Fork 🍴 — Click Fork to copy the project to your own GitHub, where you can freely modify it and submit a PR.
- Download 📥 — Click the green Code button → Download ZIP, or clone directly:
📸 Operation Diagram:
git clone https://github.com/ace-trump-tech/MindPaw.git
Step 1: Flashing Firmware (Get the Code Running)
Start by purchasing only the NodeMCU + USB-TTL and spend 30 minutes to verify the environment:
# 1. Install VSCode + PlatformIO extension
# 2. Clone the project and open it
git clone https://github.com/你的用户名/MindPaw.git
cd MindPaw/MindPaw_main

# 3. Compile
pio run

# 4. Connect NodeMCU (GPIO0 to GND → power on)
# 5. Flash firmware
pio run -t upload

# 6. Upload web pages
pio run -t uploadfs

# 7. Disconnect GPIO0 from GND → press RST
# 8. Connect to WiFi "MindPaw" → open 192.168.4.1
Detailed steps → Docs/04_Firmware_Flashing.md
Step 2: PCB Prototyping and 3D Printing (Hardware Production)
If you have a free prototyping coupon from JLCPCB, this step won't cost you anything:
| Step | Description | Reference Document |
|---|---|---|
| Export PCB Gerber Files | Open SCH&PCB/MindPaw_SCH&PCB.epro2 → File → Manufacture → Gerber | 01_Hardware_Guide.md |
| Place Order for Free Prototyping | JLCPCB order assistant → Upload Gerber → Use coupon | 02_PCB_Fabrication.md |
| 3D Print the Enclosure | Upload 3Dmodel/*.stl → Select PLA → Use coupon | 02_PCB_Fabrication.md |
Step 3: Soldering and Assembly
After receiving the PCB and 3D-printed parts:
- Solder the power section first — test 3.3V and 5V outputs for normal operation
- Solder the ESP12F core — flash firmware and verify
- Add modules one by one — OLED → servo → voice → camera → speaker
- Assemble the 3D-printed parts — install servos in the chassis → close the body → attach the feet
Wiring diagram → 05_Assembly_Guide.md
Step 4: Configure API (Optional)
If you want AI conversation and weather query functions:
| Service | Application Steps | Configuration Location |
|---|---|---|
| Seniverse Weather API | Register → Create Free Version → Copy Key | Web Console → Settings Page |
| Volcano Engine API | Register → Create Inference Access Point → Copy Key | http://192.168.4.1/aiconfig.html |
Step-by-step guide → Docs/07_API_Guide.md
Step 4 (Optional): Start the AI Infra Gateway
ai-infra is an optional independent AI infrastructure layer. It handles upstream model adaptation, authentication, timeout, and structured output validation, making it suitable for developers who wish to explore Agents, model access, and edge-device collaboration. Beginners can skip this section and use the existing ESP8266 direct connection to Doubao mode without affecting the robot dog’s basic functions or AI conversation.
cd ai-infra
cp .env.example .env
# 编辑 .env,配置 GATEWAY_TOKEN、AI_PROVIDER 和上游 API Key
python3 -m venv .venv
source .venv/bin/activate
pip install -r requirements.txt
uvicorn gateway.app:app --host 0.0.0.0 --port 8000
When no cloud Key is available, set AI_PROVIDER in .env to mock to verify the device link first. Then open http://192.168.4.1/aiconfig.html:
- API Key: Enter
GATEWAY_TOKEN - Inference Endpoint ID: Enter
mindpaw - AI Gateway Address: Enter
http://网关IP:8000/v1/chat/completions
Docker users can run cd ai-infra && docker compose up --build -d. For full instructions, see ai-infra/README.md.
Two Usage Paths
| Goal | Recommended Path |
|---|---|
| First-time reproduction of the robot dog and learning ESP8266 and Arduino | Skip ai-infra and configure the Doubao API directly |
| Research AI Agent, model routing, structured output, and edge gateways | Launch ai-infra and connect devices via Gateway |
Why is it placed in the same repository?
The current benefits of maintaining a monorepo are: beginners only need to download one repository to reproduce the project, and researchers can read the firmware, protocol, and Gateway all within the same repository. Once the interfaces stabilize and the Gateway needs to serve other robots, we can then split ai-infra into a pluggable repository or Python package while retaining versioned configuration examples in this repository.
Step Five: Configuring the Voice Module
The HLK-V20 requires configuration via a computer before use:
- Download the SU-03T configuration tool
- Connect the module via USB-TTL
- Add 22 voice commands according to the table
- Burn → Power off → Connect to MindPaw
Detailed command table → Docs/07_API_Guide.md#3-hlk-v20-语音模块配置
📁 Project Structure
MindPaw/
│
├── 3Dmodel/                    ← 3D Printed Parts (body.stl / bottom.stl / foot.stl)
│
├── SCH&PCB/                    ← Circuit Design Files (LCSC EDA Professional)
│   ├── MindPaw_SCH&PCB.epro2
│   └── README.md                ← Hardware Reproduction, Prototyping, and Troubleshooting Guide
│
├── MindPaw_main/               ← Firmware Source Code (Beginner Demo Entry)
│   ├── README.md                ← Compilation, Flashing, Acceptance, and Troubleshooting
│   ├── src/                    ← C++ Source Code
│   │   ├── main.cpp            ← Main Program (Entry, Web Server, Servo Actions)
│   │   ├── image.cpp           ← Bitmap Data for OLED Display
│   │   ├── hlkv20.*            ← HLK-V20 Voice Recognition Module Driver
│   │   ├── ov2640.*            ← OV2640 Camera Driver
│   │   ├── speaker.*           ← Melody Playback for Speaker
│   │   ├── motion_emotion.*    ← Emotional Actions for the Robodog (Dancing, Nodding, etc.)
│   │   ├── emotion_engine.*    ← Emotional State Machine (PAD Model)
│   │   ├── gesture_nn.*        ← Gesture Recognition (Lightweight MLP)
│   │   ├── multimodal_fusion.* ← Multimodal Input Fusion
│   │   ├── doubao_agent.*      ← Doubao AI API Client
│   │   └── doubao_config.h     ← AI Prompt Words and Configuration
│   ├── data/                   ← Web Control Interface (11 HTML Files)
│   ├── tools/                  ← Python Utility Scripts
│   │   └── distill_gesture.py  ← Gesture Model Training Script
│   ├── platformio.ini          ← Compilation Configuration File
│   └── PIN_WIRING.md           ← Pin Wiring Diagram
│
├── ai-infra/                   ← Standalone AI Gateway (Optional, Researcher Tutorial)
│   ├── gateway/app.py          ← OpenAI-Compatible Entry, Authentication, and Upstream Adaptation
│   ├── tests/                  ← Gateway Contract Unit Tests
│   ├── .env.example            ← Gateway Configuration Template
│   ├── Dockerfile              ← Container Deployment
│   └── README.md               ← Research Topics, Experimental Path, and Gateway Startup Guide
│
├── Picture/                    ← Image Resources
│   ├── MindPaw_oled/           ← Expression Source Files (BMP)
│   └── PCtoLCD2002/            ← Image to Pixel Art Tool
│
├── Docs/                       ← Documentation
│   ├── 01_Hardware_Guide.md    ← Hardware Design Import Guide
│   ├── 02_PCB_Fabrication.md   ← PCB Free Prototyping Guide
│   ├── 03_Image_Conversion.md  ← OLED Expression Creation Guide
│   ├── 04_Firmware_Flashing.md ← Firmware Flashing Guide
│   ├── 05_Assembly_Guide.md    ← Structure Assembly and Wiring Guide
│   ├── 06_Quick_Start.md       ← 5-Minute Quick Start Guide
│   └── 07_API_Guide.md         ← API Key Acquisition Guide
│
├── hardware-manifest.json      ← Hardware, Firmware, and Reproduction Path Inventory
├── scripts/validate_project.py ← Automated Inventory and Sensitive Configuration Validation
│
└── README.md                   ← This File
🔌 Hardware Wiring Diagram
Quick Wiring Table
| ESP12F Pin | Connected To | Notes |
|---|---|---|
| GPIO0 (D3) | HLK-V20 TX | Voice module's transmit pin |
| GPIO2 (D4) | Button → GND | Must be HIGH at startup |
| GPIO4 (D2) | OLED SDA | I2C data, requires 4.7KΩ pull-up |
| GPIO5 (D1) | OLED SCL | I2C clock, requires 4.7KΩ pull-up |
| GPIO14 (D5) | Servo 1 + OV2640 SCK | ⚠ Series 1KΩ, shared with servo |
| GPIO12 (D6) | Servo 3 + OV2640 MISO | ⚠ Series 1KΩ, shared with servo |
| GPIO13 (D7) | Servo 4 + OV2640 MOSI | ⚠ Series 1KΩ, shared with servo |
| GPIO15 (D8) | OV2640 CS | ⚠ Must have 10KΩ pull-down to GND |
| GPIO16 (D0) | Speaker (transistor driven) | Or connect to Servo 2 (choose one) |
| A0 | Battery voltage divider | — |
| TX/RX | USB-TTL debug port | For flashing and serial debugging |
⚠ Two most important rules:
- GPIO15 must be connected to a 10KΩ pull-down resistor to GND — otherwise the ESP8266 will fail to start
- When sharing SCK/MISO/MOSI with servos, add a 1KΩ series resistor — prevents signal conflicts
Full wiring diagram → Docs/05_Assembly_Guide.md
📚 Documentation Index
| If you want to... | See this |
|---|---|
| The robot dog has arrived, teach it how to play | User Manual (for non-technical users) |
| Get it running in 5 minutes | Quick Start Guide |
| Compile and flash the code | Firmware Flashing Guide |
| Understand/modify the PCB | Hardware Design Import Guide |
| Order free PCB prototypes | PCB Fabrication Guide |
| Assemble and wire it up | Structure Assembly and Wiring Guide |
| Change OLED expressions | Image Conversion Guide |
| Apply for an API key | API Key Acquisition Guide |
| All pin definitions | PIN_WIRING.md |
| Reproduce the firmware demo from scratch | MindPaw_main/README.md |
| Explore AI Infra and Edge-Cloud Agent | ai-infra/README.md |
| Import/modify/order PCBs | SCH&PCB/README.md |
🌿 Branches and Versions
The repository currently has two remote branches, each serving different roles:
| Branch | Status | Description |
|---|---|---|
main | ✅ Protected candidate (recommended to set rules in GitHub Settings → Branches) | Stable release line. Currently MindPaw 2.0 (opens in a new tab). |
feature/2.0-streaming-recon | ✅ Merged into main (merge commit 4900898) | Development branch for the 2.0 perception layer. Code is already in main and can be safely deleted. |
Recommended main branch protection rules
GitHub web interface will prompt "Your main branch isn't protected". It is recommended to add the following in Settings → Branches → Add rule:
- ✅ Require a pull request before merging
- ✅ Require status checks to pass before merging (at least check the three jobs:
docs-and-manifest,gateway-tests, andrecon-tests) - ✅ Do not allow force pushes
- ✅ Do not allow deletions
- ✅ Require linear history (optional; do not check this if you want to keep
--no-ffmerge commits)
Clean up merged feature branches
git push origin --delete feature/2.0-streaming-recon
git branch -d feature/2.0-streaming-recon       # Local
Release History
| Tag | Commit | Notes |
|---|---|---|
v2.0.0 | ac65e8c | MindPaw 2.0 — Streaming 3D reconstruction perception layer |
| (older) | — | MindPaw 1.x — Desktop Dog + Doubao conversation + Emotional response |
For detailed changelog, see RELEASE_NOTES.md.
❓ FAQ
Can I build this if I don't know how to program?
If you have no experience with embedded development, it is recommended that you at least learn the basic usage of Arduino (e.g., lighting up an LED, serial output). Then follow the documentation step by step. If you encounter any issues, you can open an issue on GitHub.
Do I have to use JLCPCB for PCB prototyping?
No. You can also hand-solder using a perforated board (breadboard). The PCB files are just more convenient and reliable. It is recommended to use hand-soldering for the first attempt, and then order a PCB prototype once successful.
Do I have to 3D print the shell?
No. You can also use cardboard, acrylic, or building blocks to assemble a body. The 3D model is just a reference shape I designed.
Can ESP32 be used instead?
Of course, and it's recommended. ESP32 has more pins, larger memory, and Bluetooth. Migration steps:
- Change
board = nodemcu-32sinplatformio.ini - Re-adjust the pin assignments for ESP32
- Most of the code does not need to be modified
Does the voice module have to use HLK-V20?
If you already have an LD3320, you can also connect it (requires 5 SPI pins). However, the HLK-V20 only needs 1 pin and has a higher recognition rate, so it is recommended.
Why is GPIO15 pulled down to GND?
This is a hardware requirement of the ESP8266: if GPIO15 is HIGH during startup, the chip will enter test mode and fail to operate normally. A 10KΩ resistor pull-down ensures it remains LOW at startup.
🧰 Maintenance and Contributions
MindPaw includes firmware, real hardware, 3D models, and the optional AI Gateway. To ensure contributions are reproducible, please read the following before submitting:
- Contribution Guide: Scope of changes, evidence requirements, and manual validation requirements
- Support and Troubleshooting: Issue triage by firmware, wiring, PCB, and Gateway
- Security Policy: Physical actuators, API keys, and vulnerability reporting
- Hardware Manifest: Authoritative paths for firmware, wiring, schematics, and models
Issues cannot consist solely of unverifiable AI-generated text; authors must personally reproduce the issue, provide logs or measurement results, and be able to respond to maintainer inquiries. AI can assist with retrieval, translation, and formatting, but cannot replace hardware safety reviews and experimental validation.
The repository’s Quality, Firmware build, and Link check workflows automatically verify the project inventory, Gateway contracts, firmware compilation, and documentation links. Any changes involving servos, power supply, pins, or motion protocols must include power-off measures and compatibility notes.
📜 License
- Software Code (
MindPaw_main/src/): MIT License - Hardware Design (
SCH&PCB/): CC BY-NC 4.0 - 3D Models (
3Dmodel/): CC BY-NC 4.0 - Documentation (
Docs/andREADME.md): CC BY 4.0
In short: Feel free to use the code, hardware and 3D models can be used and modified for personal purposes, but not for commercial use.
Files by @ace-trump-tech, at commit 21c5492, read from GitHub in your browser. Hardware license: MIT; software license: MIT. Robotheca doesn't review code: read it before running it.