Project files
3 KB
Machine-translated by Robotheca from the original in Chinese (opens in a new tab). License: MIT (opens in a new tab).
01 — Hardware Design Import Guide
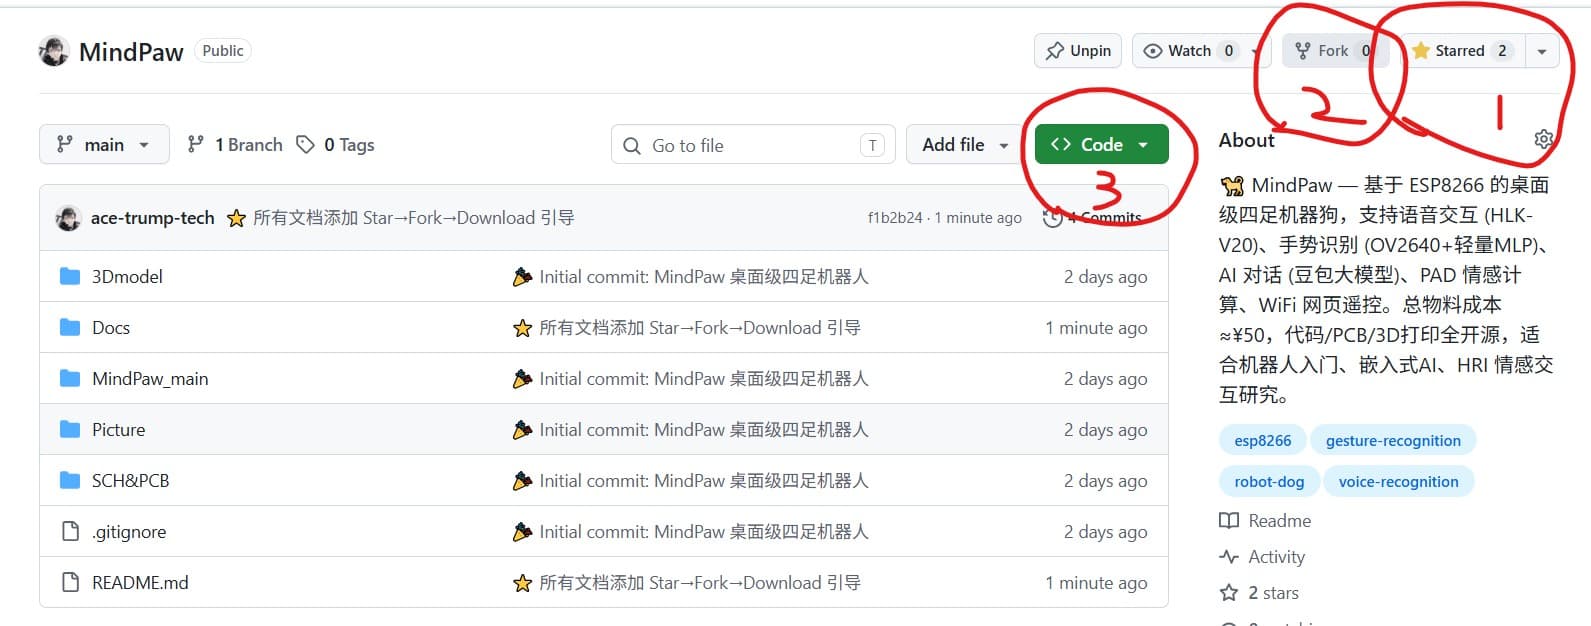
⭐ Before using this tutorial, please support this open-source project:
- Star ⭐ — Click the ⭐ Star in the upper right corner of the GitHub repository to bookmark this project for easy future access
- Fork 🍴 — Click Fork to copy the project to your GitHub account for free modifications
- Download 📥 — Click the green Code button → Download ZIP to download it locally and start replicating
📸 Operation diagram:
Importing SCH & PCB in JLCEDA
1. Open the Project File
MindPaw_SCH&PCB.epro2 is the project file for LCEDA (JLCEDA) Professional Edition by JLCPCB.
Steps to Import:
- Visit LCEDA Professional Edition (opens in a new tab) and log in
- Click File → Open → LCEDA Professional Edition in the top menu
- Select
SCH&PCB/MindPaw_SCH&PCB.epro2 - Wait for the loading to complete; the project panel on the left will display:
MindPaw_SCH&PCB.sch— SchematicMindPaw_SCH&PCB.pcb— PCB LayoutMindPaw_SCH&PCB.epro2— Project File
2. Viewing the Schematic
After opening the .sch file, you can see the complete circuit of MindPaw:
| Module | Key Components |
|---|---|
| Main Controller | ESP12F (ESP8266) |
| Servo Interface | 4 PWM Outputs |
| Voice Module | HLK-V20 (UART) |
| Camera | OV2640 (ArduCAM SPI) |
| OLED Display | SSD1306 (I2C) |
| Speaker | NPN Transistor Driver |
| Power Supply | Battery Voltage Divider ADC + Regulator |
3. Editing and Exporting Gerber Files
Modifying the PCB:
- Drag components and reroute traces directly in the PCB editor
- Press
Ctrl+Sto save after making changes
Exporting Gerber files (for PCB fabrication):
- Click File → Fabrication → Gerber Files at the top
- Keep the default settings in the pop-up dialog
- Click Export; the system will generate a ZIP archive
- This ZIP file is the standard Gerber package to send to the PCB manufacturer
Importing 3D Models into JLCPCB
Preview 3D in JLCPCB EDA
JLCPCB EDA Professional Edition supports automatic 3D preview generation from PCB:
- Open the
.pcbfile - Click View → 3D Preview at the top (or press
Shift+3) - Rotate and zoom to view the 3D PCB model
Uploading 3D Models to JLCPCB
There are 3 STL files in the 3Dmodel/ directory, which are the structural shells of the robot dog:
| File | Size | Description |
|---|---|---|
body.stl | 203 KB | Main body of the robot dog |
bottom.stl | 417 KB | Chassis (for mounting servos and battery) |
foot.stl | 211 KB | Foot (one per leg) |
If you want to 3D print these parts with JLCPCB:
- Visit JLCPCB 3D Printing (opens in a new tab)
- Click Upload File → Select an
.stlfile - Set printing parameters:
- Material: Recommended PLA (best cost-performance) or PETG (slightly stronger)
- Layer Height: 0.2mm (standard), 0.1mm (fine)
- Infill: 20% (balance of strength and weight)
- Support: Enable as needed
- Click Auto Quote to check the price
- Claim new user coupons (see the guide in the next section)
Files by @ace-trump-tech, at commit 21c5492, read from GitHub in your browser. Hardware license: MIT; software license: MIT. Robotheca doesn't review code: read it before running it.