Project files
- bpage1 file
- data7 files
- include4 files
- lib1 file
- sdcard8 files
- src4 files
- test1 file
- .gitignore1 KB
- platformio.ini2 KB
- ps2.png172 KB
- README.md6 KB

README.md
Machine-translated by Robotheca from the original in Chinese (opens in a new tab). License: Apache-2.0 (opens in a new tab).
Remote Control Center Documentation
The Remote Control Center is a web-based joystick control implemented using ESP32-S3. The ESP32-S3 connects to the main controller via UART2 serial port and sends operation commands to the main controller to control the robot.
Use a mobile device or other mobile device to connect to the ESP32-S3's Wi-Fi and operate it via a web page.
Features
- Real-time video stream: Transmit live video footage via the camera
- YOLO object detection: Supports real-time object detection, automatically boxing and labeling object names and confidence levels
- Voice control: Supports voice recognition, controlling the car via voice commands
- Gamepad control: Complete PS2-style virtual gamepad control
Control Button Instructions
The left 8-direction button provides 8 directional commands. It also includes left turn, right turn, and quick U-turn buttons above. The buttons trigger when pressed and stop when released.
The right 4-direction button uses the up and down directions for speed increase and decrease, taking effect with a single click to adjust the speed by one level. The left and right buttons are for direction adjustment, fine-tuning the direction via PWM. The buttons trigger when pressed and return to the same PWM when released.
The central section features a speed display box.
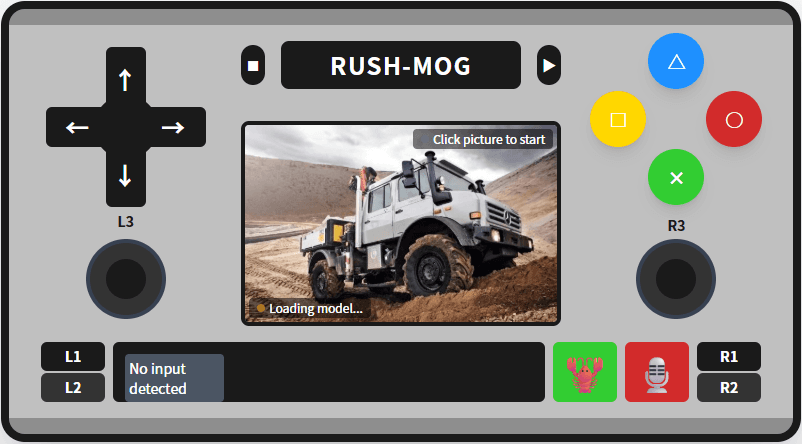
Voice Control Instructions
Feature Introduction
The system supports controlling the car via voice recognition. It uses the Web Speech API of the browser to convert speech to text and then translates the recognition results into control commands. It supports voice commands in both Chinese and English.
Set microphone permissions in the browser: chrome://settings/content/microphone
edge://settings/privacy/sitePermissions/allPermissions/microphone
Usage
- Enable voice control: Click the bottom 🎙️ button (blue) to start voice recognition.
- Speak your command: Clearly speak the control command.
- Check status: The status bar will display the recognition result and the executed action.
Supported voice commands
Edge Browser Configuration
Since the microphone requires HTTPS to work, special permission configuration is needed.
- Open the Edge browser and enter:
edge://flags/#unsafely-treat-insecure-origin-as-secure - In the Insecure origins treated as secure field, enter http://192.168.4.1 (opens in a new tab) and set it to Enabled.
- Open the Edge browser and enter http://192.168.4.1 (opens in a new tab)
- Click the Not secure icon to the left of the address bar, then select Site Permissions → Microphone → Allowed.
Direction Control
| Chinese Command | English Command | Function |
|---|---|---|
| 前进 | forward / go | Move forward |
| 后退 | backward / back | Move backward |
| 向左 | left | Move left |
| 向右 | right | Move right |
| 停止 / 停 | stop | Stop all actions |
Action Buttons
| Chinese Command | English Command | Function |
|---|---|---|
| 三角 | triangle | Press the triangle button |
| 方块 | square | Press the square button |
| 圆形 | circle | Press the circle button |
| 叉 / X | cross / x | Press the cross button |
Shoulder Buttons and Function Buttons
| Command | Function |
|---|---|
| L1 / R1 / L2 / R2 | Press the corresponding shoulder button |
| Start / start | Press the Start button |
| Select / select | Press the Select button |
Notes
- Voice recognition requires microphone permissions; please allow the browser to access the microphone.
- It is recommended to use the feature in a quiet environment to improve recognition accuracy.
- Supports modern browsers such as Chrome, Edge, and Firefox.
- Once voice control is enabled, it will automatically continue listening; click the button again to turn it off.
YOLO Object Recognition Instructions
Feature Introduction
The system integrates the COCO-SSD object detection model based on TensorFlow.js, enabling real-time object recognition in video streams directly in the browser. It supports the recognition of 80 common object categories, including:
- People (person), vehicles (car, truck, bus), animals (cat, dog, bird), etc.
- Everyday items (cell phone, cup, chair, table), etc.
Usage
- Turn on the camera: Click the "RUSH-MOG" logo at the top to start the video stream.
- Enable YOLO: Click the 🎯 button (green) on the bottom right to activate object detection.
- View detection results:
- Detected objects are marked with colored bounding boxes.
- The object class and confidence (e.g., "person 85%") are displayed above the bounding box.
- The status bar in the bottom left corner shows information about currently detected objects.
⚠️ Important Notes for Offline Use
Due to the limited storage space of ESP32's LittleFS (16MB), it is not possible to store the complete AI model file (approximately 5-10MB). The COCO-SSD model requires downloading the weight file from an external server.
Solution:
Solution 1: Pre-cached Model (Recommended)
- Connect the device to the internet for the first use
- Open the webpage and click the YOLO button to load the model
- The model will be cached by the browser and can be used offline afterward
- Browser cache location:
- Chrome:
chrome://settings/siteData - Cache is usually stored in IndexedDB
- Chrome:
Option 2: Deploy the model to a local server
- Download the COCO-SSD model file to your local server:
Model address: https://storage.googleapis.com/tfjs-models/savedmodel/ssd_lite_mobilenet_v2/ Files to download: - model.json - group1-shard1of1.bin (weight file) - Modify the model loading code in
data/index.html:// Change the model URL to your local server address yoloModel = await cocoSsd.load({ modelUrl: 'https://your-local-server.com/models/ssd_lite_mobilenet_v2' });
Option 3: Use a mobile hotspot
- Turn on the mobile hotspot and connect the ESP32 to it.
- Keep the mobile data/Wi‑Fi connected to the internet.
- After the model is loaded for the first time, the browser will cache the model file.
Notes
- The first time you start YOLO, it needs to download the model file (about 5 MB). Please wait patiently for "Loading model..." to complete.
- Object recognition runs on the browser side and will consume some device performance.
- If the model fails to load, detailed error information and solutions will be displayed.
- When the video stream is closed, YOLO will automatically stop detection.
- It is recommended to use the Chrome browser, which has the best support for TensorFlow.js.
Development Environment Setup Instructions
Step 1: Install Required Tools
Install VS Code
Install Python 3.7+ (ensure "Add Python to PATH" is checked)
Install Git (Windows / Mac)

Step 2: Install PlatformIO Plugin
Open VS Code
Enter the Extensions panel (left menu or Ctrl+Shift+X)
Search for "PlatformIO" and install it

Step 3: Develop and Compile:
Click the √ button at the bottom of VS Code to compile. (or use the shortcut ctrl + alt + B)

Step 4: Upload index.html File
Open the PlatformIO icon below the plugin installation on the left, select "Upload Filesystem Image" in di_mini/platform and execute it to upload the file.

Step 5: Flash the Program
Connect the ESP8266 board to the computer using a USB cable.
Click the -> button at the bottom of VS Code to compile.

Step 6: Monitor the Serial Port
Click the Serial Monitor button (plug icon) at the bottom of VS Code to compile.

Step 7: Connect to Wi-Fi via Mobile Phone and Access the Page
Find "RUSH-MOG" in your phone's Wi-Fi settings, connect to it, open a browser, and enter 192.168.4.1 to access the page.
Files by @coregiu, at commit c9d4b8e, read from GitHub in your browser. Hardware license: Apache-2.0; software license: Apache-2.0. Robotheca doesn't review code: read it before running it.