Project files
- .github1 file
- 3D-Models38 files
- CreateAnimation2 files
- images10 files
- RaspberryPi17 files
- UnityArkit1538 files
- Windows11 files
- .gitignore2 KB
- AGENTS.md5 KB
- CHECKLIST.md5 KB
- CONTRIBUTING.md6 KB
- LICENSE1 KB
- PACKAGING.md3 KB
- README.md12 KB
README.md
Machine-translated by Robotheca from the original in Chinese (opens in a new tab). License: MIT (opens in a new tab).
🤖 HeadNeckControl
🎯 Biomimetic Neck Servo Control System Based on RBF
🦾 Real-time control and animation playback of a bionic head via tendons
📹 Demo
👻 Bionic Neck Operation Demonstration
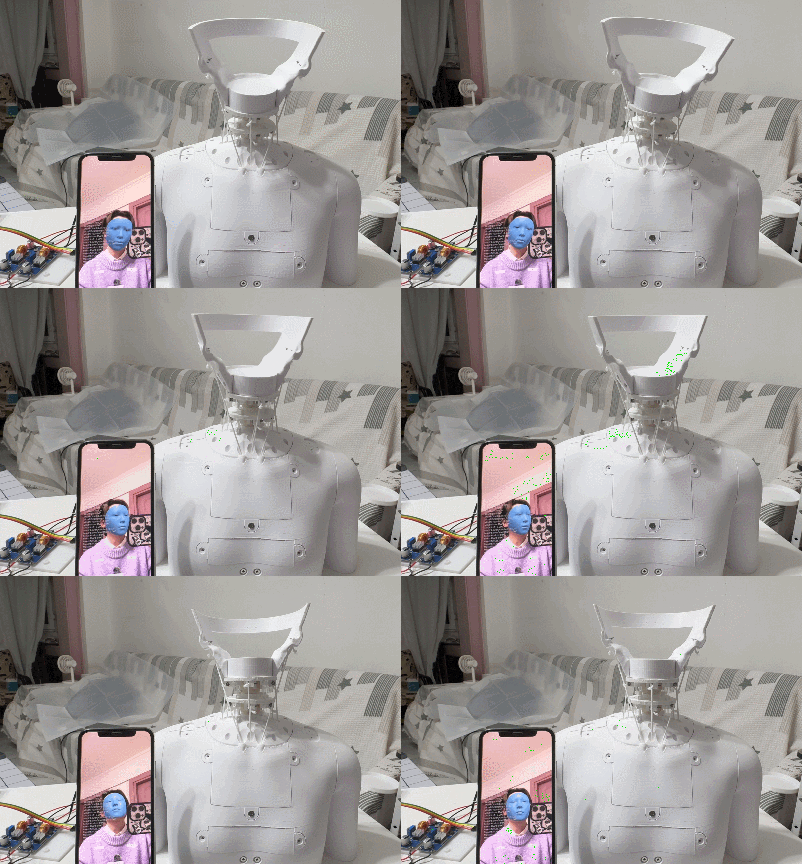
✨ Real-time tracking demonstration of the bionic neck ✨
📖 Project Introduction
HeadNeckControl is a complete bionic neck control system that simulates muscle movement by using a Raspberry Pi and PCA9685 to drive servos that pull tendons, controlling the movement of a bionic head. The system supports multiple control methods: ARKit facial tracking via a smartphone, animation file playback, manual control and testing mode on Windows, and can precisely control the three degrees of freedom—pitch, yaw, and roll—of the head.
✨ Features
- 📱 ARKit Real-time Tracking: Capture facial poses using ARKit on iOS devices and send them directly to the Raspberry Pi via UDP for real-time control
- 🎮 Unity iOS App: Provides a complete Unity project for generating ARKit facial tracking iOS apps, supporting customization and extension
- 🎬 Animation Playback: Supports playing preset head motion sequences, with animation files stored locally on the Raspberry Pi
- 🖱️ Windows Manual Control: Offers a graphical interface with sliders to directly control servo angles
- 🔧 Test Mode: A test mode for debugging and calibrating servos
- 🎨 Smooth Transitions: Uses RBF (Radial Basis Function) interpolation algorithms to achieve smooth motion transitions
- 🔄 Multiple Input Sources: Supports flexible switching between various input sources
🏗️ System Architecture
┌─────────────────┐     UDP      ┌──────────────────┐
│  Windows App    │ ───────────> │  Raspberry Pi    │
│  (C# .NET 8)    │              │   (Python 3.11)  │
│                 │              │                  │
│  - TrackBar     │              │  - BaseInput     │
│  - Manual Control│             │  - HeadMapper    │
└─────────────────┘              │ - ServoController│
                                 └────────┬─────────┘
                                          │
                            UDP           │ I2C
┌─────────────────┐                       │
│   iOS Device    │ ──────────────────────┤
│   (ARKit)       │                       ▼
└─────────────────┘              ┌──────────────┐
                                 │   PCA9685    │
                                 │ (PWM Driver) │
                                 └──────┬───────┘
                                        │
                                       Servos
                                        ▼
                                 ┌──────────────┐
                                 │  Bionic Head │
                                 └──────────────┘
📡 Data Flow Description:
- 💻 Windows Side: Manually control servo angles via sliders and send servo angle data to the Raspberry Pi over UDP
- 🍎 iOS ARKit Side: Directly send facial pose data captured by ARKit to the Raspberry Pi over UDP
- 🎞️ Animation Playback: Animation files (
.anim) are stored locally on the Raspberry Pi and read/played by the Raspberry Pi - 🥧 Raspberry Pi: Acts as the control center, receiving data from all input sources, mapping it via HeadMapper, and controlling the servos
🛒 Hardware List
📦 Required Hardware
- 🥧 Raspberry Pi: 3B+ or higher version
- 💻 Windows PC: Any, must be on the same local network as the Raspberry Pi
- 🔌 PCA9685 PWM Driver Board: One piece
- ⚙️ Servo Motors: MG996R or similar metal-gear servos (8 pieces), each requiring a cross-shaped servo horn, pre-set to 90 degrees
- 🔋 Power Supply: 12V 100W power supply + 2-4 5V/5A buck converter modules (adjust based on actual needs)
- 🔗 Dupont Wires, Jumper Wires: Several, for connecting power supply, Raspberry Pi, PCA9685, and servos
- 🧵 Dyneema Rope: 1.5mm diameter, 5 meters long; must be pre-stretched (hang a heavy object for a day or two) and cut into 12 pieces, each 35cm long
- 🔬 Teflon Tubes: Inner diameter 2mm * outer diameter 3mm, 2 meters long; cut into appropriate lengths based on the images in the
imagefolder - 💎 Ceramic Eyes: Outer diameter 3.9mm * hole 2.3mm * total height 6mm (25 pieces)
- ⭕ Small Bearings: 9 * 14 * 2.5mm (8 pieces)
- 🫧 TPU O-rings: 8mm diameter * 2mm width (8 pieces); rubber bands of similar size can be used as substitutes
- 💧 Glue: 502 or other quick-drying adhesive
- 🔩 Screws: Flat-head self-tapping M3 * 8mm (50 pieces), flat-head M3 * 5mm (8 pieces), flat-head self-tapping M2 * 10mm (32 pieces), flat-head self-tapping M2 * 8mm (12 pieces), M2 * 10mm + nuts (8 sets) (it's recommended to prepare extra screws as they are easily lost 😅)
🛠️ Optional Hardware
- 🧩 Breadboard (optional): Used for circuit connections
- 🧴 Edge-straightening liquid (optional): Used to smooth out frayed wire ends for easier threading; ordinary office glue can be used as a substitute
- 🪄 Lubricating grease (optional): For lubricating joint connections, preferably included
🔧 Tools you might want to have
- ✂️ Screwdrivers, pliers: If you don't have these, you might as well give up on this project 👋
- 🖨️ FDM 3D printer: Ideally with a build volume larger than 200 × 200 × 200 mm; if you don’t have one, find a printing service
- 💪 Rotary tool: For cleaning up rough details on printed parts; if you don’t have one, sandpaper will do in a pinch
🌟 What we hope you can have
- 🏆 Strong hands-on ability: All components of this project need to be assembled by yourself 😅
- 💖 Great patience: The proportions of this neck are designed based on the size of a real 5-6-year-old child. Many parts are very small and difficult to install, so if you've already started, please be patient ❤
🚀 Quick Start
🧩 Model Assembly and Control
- Please watch the video on Bilibili: Daughter's Neck Open Source! (opens in a new tab)
🥧 Raspberry Pi Environment Configuration
1️⃣ System Requirements
- Operating System: Raspberry Pi OS
- Python Version: Python 3.10 or higher (this system uses Python 3.11)
- Memory: At least 2GB RAM (4GB recommended)
2️⃣ Clone the project (recommended to clone on a PC, not on a Raspberry Pi; then copy the RaspberryPi folder to the Raspberry Pi)
cd ~
git clone https://github.com/yourusername/HeadNeckControl.git
cd HeadNeckControl/RaspberryPi
3️⃣ Install Python Dependencies
# Update the system
sudo apt update
sudo apt upgrade -y

# Install system dependencies
sudo apt install -y python3-pip python3-dev

# Install Python packages
pip3 install -r requirements.txt
4️⃣ Enable the I2C interface
# Method 1: Use raspi-config
sudo raspi-config
# Select Interface Options -> I2C -> Enable

# Method 2: Command line
sudo apt install -y i2c-tools
sudo raspi-config nonint do_i2c 0

# Reboot the Raspberry Pi
sudo reboot
5️⃣ Verify I2C Connection
After rebooting, check if the PCA9685 is detected: 🔍
# List all I2C devices
i2cdetect -y 1

# You should see output similar to the following (0x40 is the default address of PCA9685):
#      0  1  2  3  4  5  6  7  8  9  a  b  c  d  e  f
# 00:          -- -- -- -- -- -- -- -- -- -- -- -- --
# 10: -- -- -- -- -- -- -- -- -- -- -- -- -- -- -- --
# 20: -- -- -- -- -- -- -- -- -- -- -- -- -- -- -- --
# 30: -- -- -- -- -- -- -- -- -- -- -- -- -- -- -- --
# 40: 40 -- -- -- -- -- -- -- -- -- -- -- -- -- --
# ...
If you see 40, the PCA9685 is correctly connected.
6️⃣ Configuring config.py
Edit the RaspberryPi/config.py file and modify the following configurations according to your hardware and network environment:
class Config():
    DEBUG = True              # Debug mode: True = do not operate hardware, only print values; False = actually control servos
    ip = ''                   # Raspberry Pi IP address (leave blank for auto-detection, or manually fill in like '192.168.1.100')
    port = 9003               # UDP listening port (receives ARKit/Windows data)
    servo_count = 8           # Total number of servos
    test_servo_count = 8      # Number of servos in test mode
    pca9685_address = [0x40]  # PCA9685 driver board I2C address (supports multiple boards)
    pca_frequency = 50        # PWM frequency (Hz), typically 50 for servos
    is_anim = False           # Whether to load animation file; no need to change, will be automatically updated based on options
    anim_file = 'anim_data/neck.anim'           # Animation file path
    neck_config_file = 'controller/neck_matrix_config.json'  # Servo angle mapping configuration file, exported from Windows matrix file
⚙️ Configuration Notes:
- For the first run, it is recommended to keep
DEBUG = True. After verifying that data reception and mapping logic are normal, change it toFalse. - When
ipis left blank, the Raspberry Pi's IP address will be auto-detected. If the network environment is complex, you can manually specify it. - The
portmust match the sending port on the Windows and iOS sides. - To add more PCA9685 boards, add their addresses to the
pca9685_addresslist (e.g.,[0x40, 0x41]). - The configuration in
neck_config_fileis generated by the tool on the Windows side.
📁 Project Structure
HeadNeckControl/
 ├── RaspberryPi/              # Raspberry Pi code (Python)
 │   ├── main.py             # Main program entry
 │   ├── config.py           # Configuration file
 │   ├── controller/         # Controller module
 │   │   ├── servo_controller.py   # Servo controller
 │   │   └── head_mapper.py       # Head pose mapper
 │   ├── input/              # Input source module
 │   │   ├── base_input.py        # Base input class
 │   │   ├── input_arkit.py       # ARKit input source
 │   │   ├── input_anim.py        # Animation file input source
 │   │   ├── input_ai.py          # AI input source
 │   │   └── input_test.py       # Test input source
 │   ├── utils/              # Utility module
 │   │   └── filetools.py        # File processing tools
 │   ├── anim_data/          # Animation file directory
 │   └── requirements.txt    # Python dependencies
 │
 ├── Windows/                # Windows code (C#)
 │   └── NeckControlOutput/
 │       ├── Form1.cs            # Main form
 │       ├── Form1.Designer.cs   # Form designer (auto-generated)
 │       ├── Models.cs           # Data models
 │       ├── RBFHelper.cs        # RBF interpolation helper
 │       ├── WeightMatrixHelper.cs # Weight matrix calculator
 │       ├── Program.cs          # Program entry
 │       └── NeckControlOutput.csproj # Project file
 │
 ├── UnityArkit/              # Unity iOS ARKit app
 │   ├── Assets/             # Unity assets and scripts
 │   │   ├── Scenes/          # Scene files
 │   │   ├── Scripts/         # C# scripts
 │   │   └── Samples/         # AR Foundation samples
 │   ├── Packages/           # Unity package configuration
 │   ├── ProjectSettings/     # Project settings
 │   └── UnityArkit.sln     # Solution file
 │
 ├── 3D-Models/              # 3D printing model files
 │   ├── OBJ/                 # Wavefront OBJ format models
 │   ├── 3MF/                 # Bambu Studio slicing format models
 │   └── README.md            # 3D printing instructions
 │
 ├── AGENTS.md               # Developer guide
 ├── CHECKLIST.md            # Project checklist
 ├── CONTRIBUTING.md         # Contribution guide
 ├── LICENSE                # MIT License
 ├── PACKAGING.md            # Packaging and release guide
 ├── README.md              # This file
 └── .gitignore            # Git ignore rules
🤝 Contributing
Contributions to the code, bug reports, and improvement suggestions are welcome! Please read CONTRIBUTING.md for details.
📜 License
This project is licensed under the MIT License - see the LICENSE file for details.
🙏 Acknowledgments
- Adafruit's CircuitPython (opens in a new tab) library
📺 Welcome to watch my Bilibili
- 📺 Bilibili 星瑶爸爸呀 (opens in a new tab)
Made with ❤️ by 🌟 Robotics Enthusiasts 🤖✨
Files by @xingyaodad, at commit 839e836, read from GitHub in your browser. Hardware license: MIT; software license: MIT. Robotheca doesn't review code: read it before running it.